When I was in high school, I made a rose out of a mud clay or play dough or something, and it impressed my Mom. My Mother went to an art store and came home with a box of Sculpey I really liked working with it.. I made quite a few roses, I was frustrated by the difficulty supporting the sculpey as it baked, so my flowers would not be squashed on one side. I was also frustrated by painting the sculpey, rather than having it colored somehow, the paint didnt look the way I wanted and frankly, I've never been good at painting... (well I made one thing at camp look the way I envisioned it.. but I ruined it last year while we where moving. Tempera paint and a sink full of hot dirty dish water are not a good mix)
Before long homework, work and school plays took over all the time I had.. I didn't get to play with my clay and really learn, and when I had questions about it I didn't know where to go for the answers. This was long before we all had Internet at home. I only knew what internet was because my Dad had it at work. There was not the wealth on information out there that there is now. So my clay was pulled out once in a while.. I would fiddle with it and sometimes I would bake it sometimes it was only stress relief and I'd mush it all up again.
Fast Forward to married life ...One day I went into our local art store and there, low and behold was colored polymer clay. Fimo to be exact. So I bought a few colors... Only to learn later that I still didn't know the ins and outs of working with polymer clay, I didn't know how to blend two pinks to get he look I wanted, or how not to over blend, so I had swirls rather than mud. I made a few beads, but I could not get the pinks to blend in a natural way so I could make roses I was happy with. mostly the clay sat around.
Forward again. I lost the hoof off of a model horse. after a few days of thought.. I decided to go buy some polymer clay to make a new one. My first polymer clay mold was of a model horse hoof. this lead me to play with the clay a little more but mostly my time was consumed by the bigger of the little ones.. and creatively I was spending my energies on photography, knitting, sewing etc. (jack of all trades/crafts master of none)
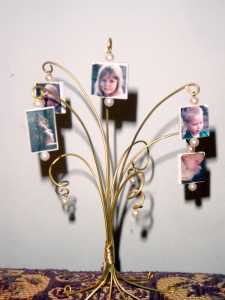
After J was born I started to get more into Photography;One day on a photography mb someone asked if anyone was making photo tiles from clay. After reading some instructions, and seeing a few pictures I thought it looked like a fun craft to try. I made my Grandmothers little brass wire trees with picture tile ornaments for Christmas 2004. Then I began to refine the photo tiles, and as people saw ones I had made as gifts I began to get requests to sell them. And so now I do.
I have recently been looking for a way to seal the tiles to make them sturdier, for people who might want to have them on keychains and such, And I have discovered a wealth on information out there from PC artists, plus some techniques I'm like to try, but what I found most inspiring was this.
Polymer Peace Cranes Origami Cranes, something I have been making since the Fourth Grade, made from Polymer Clay... I never could figure out how to protect the paper cranes to use them as ornaments, and now.. I'm so inspired by the mix of the this medium with this one of my favorite crafts!! I have already made a couple.. and one of them looks pretty decent... now I just need to learn to make more exciting "papers" .


the photo tiles and the brass tree is gorgeous! i thought you bought it when i first saw the photo before reading your post.do you think that those small, photo tiles would be too heavy as christmas tree ornaments? cause if not, it would be so cool to adorn them with christmas embellishments dangling at the bottom. like little bells, with a red bow... or even really nice glass beads in whatever colour coordination one's tree is decked out in.
ReplyDeleteThe clay isn't too bad weight-wise, I have been making tiles mostly 1" x 1" , but when I was first experimenting I made some bigger ones, and they aren't real weighty, no worse than anything about the same size or a little bigger from Hallmark. The trick on the bigger ones is getting the transfer to stick. I think using a clay that can back longer (and is more expensive of course) would help.I have to experiment with the new formula of the transfer paper.. (I love it when they change something I don't have a problem with!!
ReplyDeleteWould you be interested in share step by step instructions on how to make the tiles and transfer the photos?
ReplyDelete